Menu System
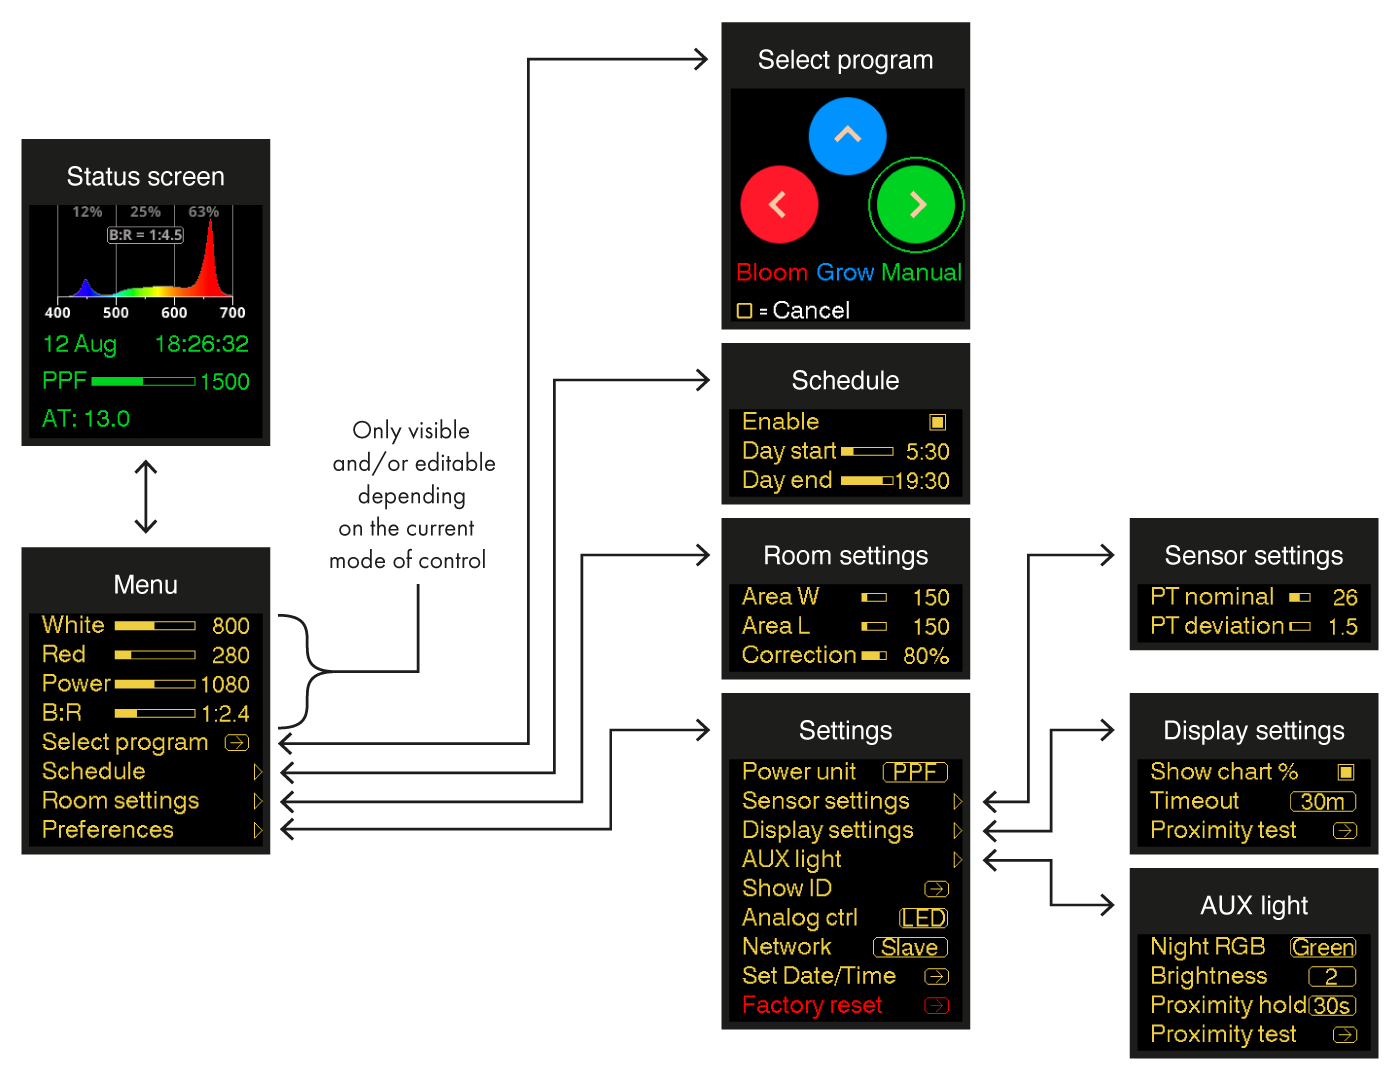
| Status screen | Displays the date/time, power control slider, and up to two sensor values. | |||||||||||||||||||
| Menu | Contains the channel controls (only if the 🟢 Manual program is selected), some common setting submenus, and the Preferences submenu which contains the remainder of the settings. The channel controls are also visible (not adjustable) when remote controlled. | |||||||||||||||||||
| Select program |
Lets the user choose between two predefined programs or the 🟢 Manual program. 🔵 Grow Sets the B:R ratio to 1:1.5 and the schedule from 6:00 to 24:00 The current program is indicated by the color of the status screen. |
|||||||||||||||||||
| Schedule | Enable | Whether the schedule is activated or not. The schedule will turn off the output when it is not day according to the internal clock. The schedule is only used in the three manual programs and will be ignored for remote control or slave control. |
||||||||||||||||||
| Day start [0:00 .. 23:30] (step 0:30) |
Sets the start and end of the day. This can be configured by hand in steps of 30 minutes. ‘Day end’ can be set before ‘Day start’, in which case the day cycle will continue past midnight. (0:00 and 24:00 are the same timestamp, just with a different representation). |
|||||||||||||||||||
|
Day end
|
||||||||||||||||||||
|
Room settings |
Area W [0..200] (step 5) |
The size (in centimeter) of the effective illuminated area of this fixture. This can be the size of a growing tent for a single fixture, or the spacing of fixtures in a grid. | ||||||||||||||||||
| Area L [0..200] (step 5) |
||||||||||||||||||||
| Correction |
The correction factor for taking into account wall and other losses. When lower than 100%, the displayed PPFD and DLI values are proportionally lowered.
|
|||||||||||||||||||
| Preferences | Power unit [%, Watt, PPF, PPFD, DLI] |
The displayed power unit. ⮕ See chapter Changing the Power Unit. | ||||||||||||||||||
| Show ID | Show the network ID (sort of like an IP address), the hardware version, software version, and system temperature. | |||||||||||||||||||
| Analog ctrl [LED, HID] |
Select which of the two Analog Protocols will be used, “LED” or “HID”. ⮕ For its usage, see chapter Chaining Fixtures. | |||||||||||||||||||
| Network [Slave, Master, Local] |
Select whether this controller acts as “Master” or “Slave” for controller-less chaining. A third option is “Local” which neither sends nor receives control values. ⮕ For more information, see chapter Chaining Fixtures, section Master/slave mode without an external controller. | |||||||||||||||||||
| Set Date/Time | Set the internal clock. ⮕ See chapter Stand-Alone Functionality, section Check the clock. | |||||||||||||||||||
| Factory Reset |
Resets all user-accessible settings and preferences. After rebooting, it presents the program chooser.
|
|||||||||||||||||||
| Sensor settings | PT Nominal [0 .. 50] (step 1) |
The ideal plant temperature (in °C) | ||||||||||||||||||
| PT deviation [0.5 .. 10] (step 0.5) |
The number of degrees the measured plant temperature may deviate from the nominal value. ⮕ For more information, see the chapter on Peripheral Devices, section Plant Temperature (PT) Camera.
|
|||||||||||||||||||
| Display settings | Show chart % | Whether to show informative overlays on the chart. Specifically, this enables the grid lines, R:G:B percentages, and B:R ratio. Disable this for a cleaner look. The “Night Mode” notification will be shown on the chart regardless of this option. | ||||||||||||||||||
| Timeout [10s, 1m, 30m, Never] |
The duration the display should stay on after the last event and when proximity is no longer detected.
|
|||||||||||||||||||
| Proximity test |
Test the proximity sensor (unaffected by hold timers) using a full-screen display that’s easy to recognize from a distance. The sensor can detect from up to 3 meters in ideal conditions.
|
|||||||||||||||||||
| Aux light | Night RGB Red, Green, Blue |
The color of the auxiliary light at night. ⮕ For more information, see chapter Working Light. | ||||||||||||||||||
| Brightness [Off, 1, 2, 3, 4, 5, 6, 7, Max] |
The brightness of the auxiliary light at night. ⮕ For more information, see chapter Working Light. | |||||||||||||||||||
| Proximity hold [<5s, 10s, 15s, 30s, 1m, 2m, 5m, 10m, 15m, 30m, 1h] |
The duration the proximity light should stay on after proximity is no longer detected. ⮕ For more information, see chapter Working Light. | |||||||||||||||||||
| Proximity test | Same as above, but also useful for quickly testing the Working Light feature. | |||||||||||||||||||